Sunday, November 30, 2014

Peace and Joy - TreeMendous Tree

Hello!

I hope all are settled and resting from their Thanksgiving holidays. I'm still a little frazzled, but beginning to feel like I'm getting my little nest back under control! I'm too A-type to be able to "relax" when I am surround by disarray. I'm ready to get with it this week and get the remainder of it put to rest. Time for the tree to go up and gifts to be wrapped. I have them stashed in piles in my extra guest room and I welcome the opportunity to neaten it back up.

I'm popping in to share a card before our long weekend comes to a close. Sniffle.

I thought this would be perfect to add to the Moxie Fab World's Treemendous Tree Challenge, while playing along with The Paper Players Tic-Tac-Toe Challenge.


I chose the first column from the tic-tac-toe board, Tree/Patterned Paper/Star. I love the "rustic" feel on this card with the muted blue of the patterned paper, which is from a My Mind's Eye Lost & Found Christmas 6x6 pad. I distressed the edges with Desert Sand (CTMH) ink. The tree is stamped from PTI's O'Tannenbaum stamp set and the sentiment from PTI's 'Tis The Season stamp set. I added the ground beneath the tree using a Spectrum Noir Marker. The sentiment is stamped in dark Cocoa ink to keep with the rustic feel of the card.


Thanks so much for stopping by to visit!
 
God Bless,
Mandy

 
Pin It

Friday, November 28, 2014

H2H - No Rules NOvember Challenge

Hello!

I hope all are doing well and recovering from their stuffed lunches, suppers, dinners, and leftovers galore. We are still visiting with my family in the western part of our great state and still eating all the food we had Thursday night. We may have over done it a little. We did more "potluck" between family members, trying to give some of the matriarchs of the family a break and as much as we planned a menu and worked not to have too much food - it looks like none of us spoke to each other about who was cooking what! Ha! It was comical and a little sad, too. I kept joking that we should invite more people over to help eat it - and if we had known someone who needed to eat, we really would have done that. I can assure you my family will not let it go to waste - my parents are relentless about leftovers and it WILL be eaten! Big Daddy and I are kind of leftover lightweights. I try, because that's how I was raised but.....we can't hang with the big dogs in that department.

We are not quite finished celebrating. The kids, Big Daddy, and I are off to my in-laws bright and early tomorrow morning to be there in time for lunch! They are about 3 hours away from my family and only 45 min - 1 hour away from our home. So, Lord willing, we will be home and in our own beds tomorrow night! We SO love hanging out with all of our family (even if we feel like we are going crazy part of the time) and I can't even put into words how happy/excited/joyful it makes The Piglets, but we all 4 really, really, really like to sleep in our own beds!

On to the fun part -- I'm popping in to share a card I have for the Heart to Heart No Rules NOvember challenge. :)   No rules -- just use CTMH products!

(I apologize, in advance, for the quality of this picture! It was the best I could do with what I have at the moment.)


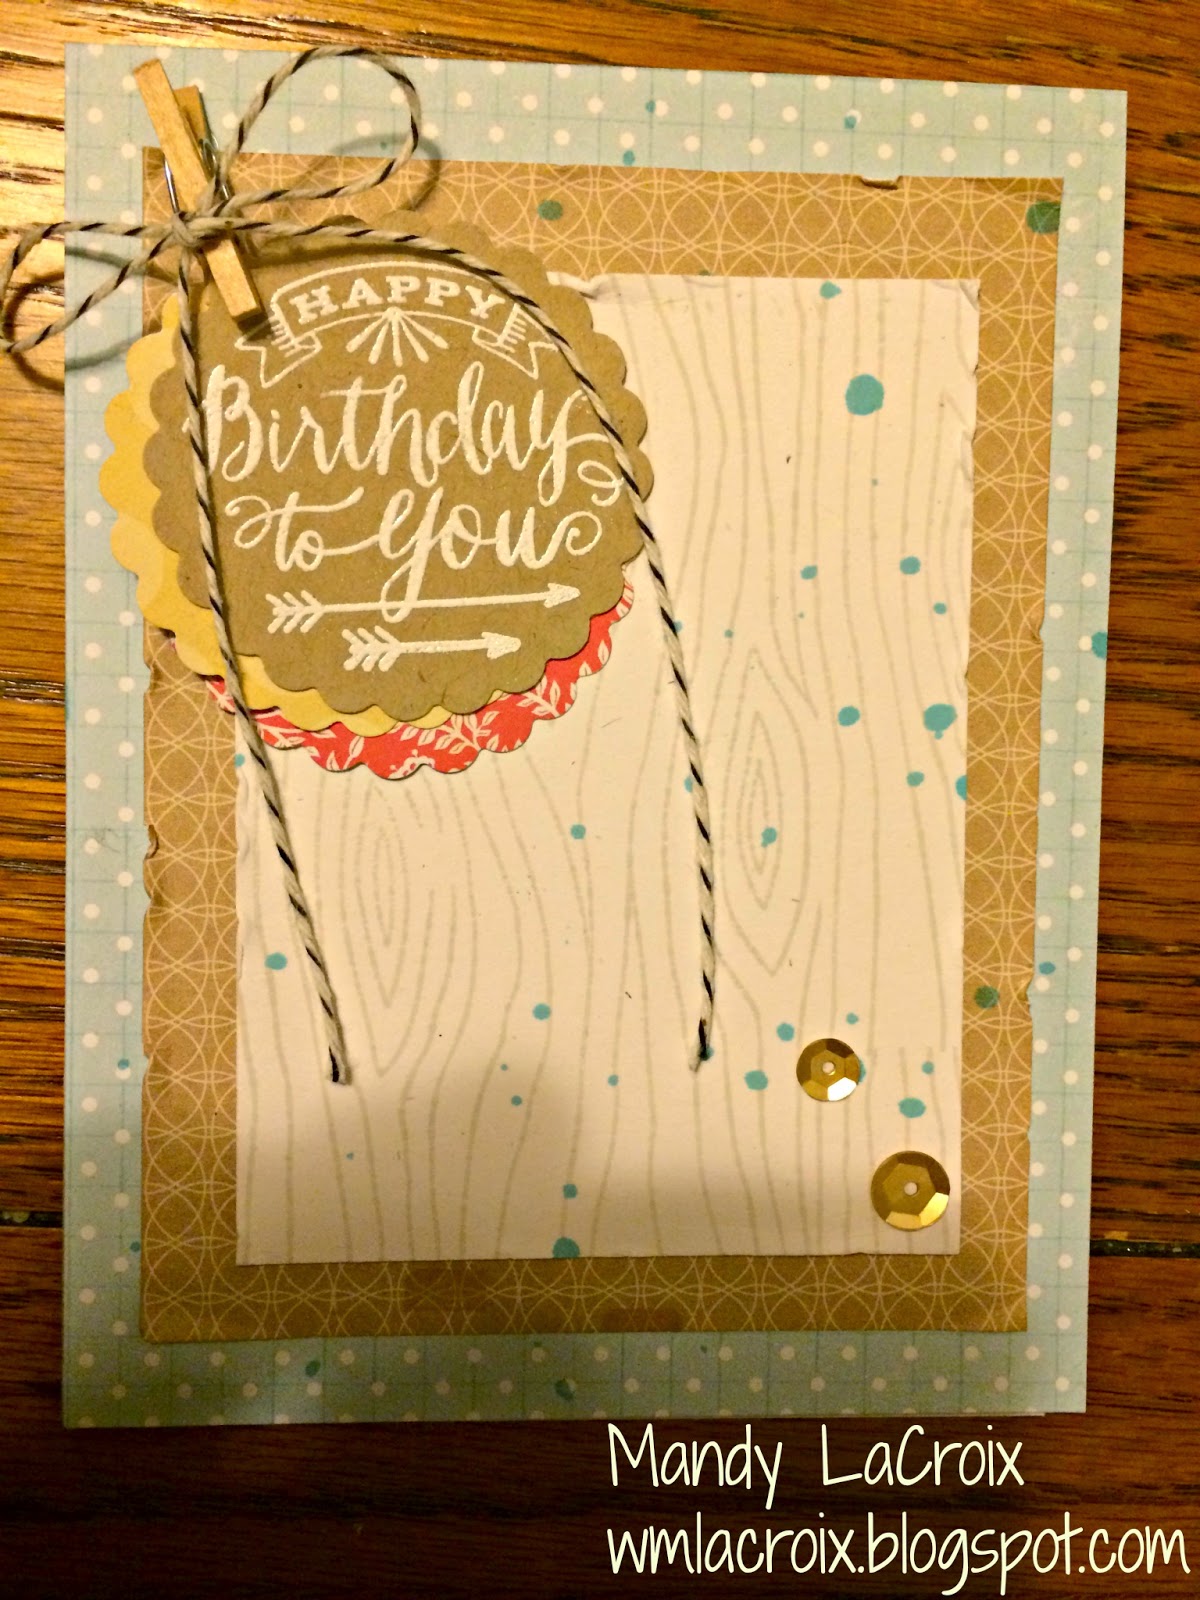
I love the fun elements of this one....I have layered different patterns of paper from various 6x6 pads and distressed the edges of a cardstock panel (PTI Rustic White) after stamping the wood grain pattern from the CTMH Pathfinding Card WOTG kit stamp set. After adhering all of these layers on the card, I splattered some Crystal Blue reinker. I then punched three different 2" scalloped circles (CTMH Punch) and white embossed the birthday sentiment (from You Mean the World to Me stamp set) on kraft cardstock (PTI). These are layered up and clasped together with a mini clothespin and black twine (PTI) bow prior to adhering to my card. --- I LOVE this stamp set and have already used it several times! I can tell it's going to be a "favorite"! 

Well  --- I hope you like it!. 

Thanks so much for stopping by to visit! 

God Bless, 
Mandy

Pin It

Thursday, November 27, 2014

Happy Thanksgiving!


Hello there !
Hope all are enjoying a lovely day with family and friends.  We are hitting the road as I type this, heading to my sister's house in West TN.   We had a change in venue this year, giving my aunt and uncle a break.  It's kinda hard to believe "our generation" is now in charge if some of these family gatherings. I still don't feel like we are old enough! Lol.

I'm sharing a fun Thanksgiving card I made a while back. I think for a submission call.  :) I love the colors and these papers from Basic Grey's Persimmon pad. (yes, I'm still riding that pad out. I so love it.)


The stamps I used are from CTMH Perfect Fit Thanksgiving.  I {heart} this set!  The little flourish accent on the side of my patterned panel is actually the coordinating did cut and stamp from the turkey! It's so pretty - not the cutesy. (Which I also love. Oohhhh and now that I think of it-- I don't have a cutesy turkey! I need to get on the Paper Smooches website, don't I?!) lol. I need more stamps for sure. Hee hee. This is NOT true. Lol.

Thanks so much for stoping by to visit!

God bless,
Mandy Pin It

Tuesday, November 25, 2014

Publication Share - Joy Wreath Frame

Hello!

I hope all are going into their Holiday week healthy and happy and ready for the onslaught of family and food. :) I always love it for the first few hours -- then want nothing more than quiet, alone time, and to exercise! I have a hard time "sitting around". :) I do love to eat, but I can even get enough of that!

I'm back to share another published project, this one my most recent. It's in the December 2014 issue of Paper Crafts & Scrapbooking, our beloved Mother Ship is who is sailing away in only 2 short issues. Sniffle. Still super sad about that. :(

This project is one of my favorites and one I'm most proud of!

 
This was actually a gold framed mirror that I picked up at a local thrift shop for cheap. I brought it home and spray painted the mirror black and the frame antique white. I die cut the wreath and "Joy" using my Silhouette and Oracal 651 vinyl. After adhering it, I added the adhesive back "pearls" from Michael's. It's so simple but the colors really pack a punch. I now have it sitting out on our foyer table on display and it looks so at home! I loved how the black background has the chalkboard look. It's trendy and makes the colors of the vinyl show up really well.
 
Grab your copy of December 2014 Paper Crafts and Scrapbooking here. It's a great source of inspiration, chalked full of beautiful projects!
 
Paper Crafts & Scrapbooking December 2014 Digital Issue
 
Thanks so much for stopping by to visit!
 
God Bless,
Mandy
Pin It

Sunday, November 23, 2014

CAS(E) this Sketch #101 & MUSE Challenge -- SMILE!

Hello!

I'm popping in to share a card I made playing along with CAS(E) This Sketch and the Muse Challenge Club. I'm so sad the weekend is over. The Sunday night blues come over me at night around here. I'm determined to make a card share one of my last orders of business -- to cheer me up! :) Then I will at least do some relaxing before I go to sleep.

Here are the fun sketch and inspiration:

 
Here is my card using PTI's Splat and Wet Paint II stamp sets:
 
 
I stamped the circles using PTI Splat stamp set - I selected an image and actually stamped the back side of it to get the solid circle. I used different ink colors, slightly overlapping each time - almost making a flower pattern. These are all CTMH ink colors: Sunset, Honey, Watermelon, Pear, and Dutch Blue. To further complicate things, I used second generation ink each time. Since the colors were so bright to begin with I still have plenty of color in my design, but it's not overpowering and allowed me to overlap my sentiment (Wet Paint II) in bold black. (Which I love to do). I also stamped the ampersand from the Splat stamp set, trimmed it and popped it up using foam tape for dimension. I kinda functions like the center of the flower. I layered this over Black PTI cardstock. I really like how it turned out.
 
Thanks so much for stopping by to visit!
 
God Bless,
Mandy


Pin It

Saturday, November 22, 2014

Christmas Card Time! --- Joy To The World

Happy Weekend!

I, for one, am shocked at how fast the day is flying by! As always. We have a rare weekend with all 4 of us at home and sometimes we don't even know what to do with ourselves. :) I think the kids and Big Daddy are going to start the Christmas Decorating outside work. We have a nice warm day and he's off work, so get it going! They absolutely love it, of course. So they are excited. I might have to be nice and help but I usually don't! ha! Not my territory! They have a thing going and I don't want to mess it up. ; )

I'm sharing a card I made yesterday with inspiration from all the Christmas themes and the sketch over at the Fusion Challenge.

I also love this inspiration photo from over at Just Us Girls Challenge:

 
Here is my card using PTI's O' Tannenbaum and the inspiration that abounds for us right now during this, the most wonderful time of the year. Ha!   8-)  Nerd smiley!


I stamped the tree and all it's trimmings using my O' Tannenbaum set then punched a circle in lightweight cardstock big enough to fit around the tree. I then tacked it down with temporary adhesive and sponged around the circle working from outside to inside to create the "faded" focal circle. I used Whisper CTMH ink (a good light gray). I then layered a trimmed down piece of CTMH Silver Shimmer Trim (it's original thickness cover up too much of my pretty tree!). Then die cut a star from my Silhouette before stamping 'Joy' on it and adhering it over a scrap piece of burlap paper that was laying on my desk. (It needed a little something.) I stamped "to the world" from my Wet Paint Holiday set, also from PTI. Everything is layered onto a Simply Chartreuse card base, the same colors used to stamp the tree and make the star - tie it all together. 8-)
 
 
Thanks so much for stopping by to visit!
 
God Bless,
Mandy


Pin It

Curtain Call and Paper Piecing .... Tomatoes?!

Hello -

I feel a little like Sheldon Cooper when he does "Sheldon Cooper Presents Fun with Flags". Only mine is "Mandy LaCroix presents Artsy Tomatoes". HA! However, I am certain that mine is nowhere near as entertaining as his!

I made another card today for my Grannie-In-Law's gift set. And, I used the Curtain Call - Pin Cushion challenge to inspire me.


I paper pieced my tomatoes using different red patterned papers, inspired by the patterned pin cushions in the inspiration photo.
 
 
The two tomatoes in front are stamped and trimmed from a piece of Lawn Fawn's Snow Day paper while the back two are trimmed from DIY Shop 6x6 pad by Crate Paper. I used a scrap piece of CTMH Olive cardstock for the leaves and colored the stems in with a brown Zig marker. I scribbled a little "ground" underneath them using a Spectrum Noir Marker.  I layered the panel over the card base that was trimmed out using burlap paper by DCWV. The accent panel is up on foam tape for dimension.  Didn't take very long and I think it will go great with the collection (so far it's only 2 but I call it a collection because it will be one quite soon).
 
Thanks so much for stopping by to visit!
 
God Bless,
Mandy


Pin It

Friday, November 21, 2014

Publication Share - Country Best Wishes

Hello!

I, for one, and pleased as punch that today is Friday! I get to have a "Girl's Night Out" tonight with one of my besties to celebrate her birthday and get our birthday pedis! For each of our birthdays, we get each other a pedicure and GNO - that way we know we get, at least, 2 guilt-free ones a year! Ha. Not those aren't the only pedi/GNO's that we have -- but I consider these guilt-free. There IS a difference. I know all the Mom's get it! :)

And the other wonderful news for me today is that Big Daddy's Saturday work was cancelled! So we get to have him at home tomorrow. Whoohoo! The kids miss him so much and want to play with him so badly. And it's understandable. I'm also proud for him that he gets a day to rest! He gets up SO early and works long, hard days. I can tell by looking at him sometimes just how tired he is.

Now on to the fun stuff. Well, bittersweet anway. As I mentioned in my first post of this series, I've decided to do several posts over the next few weeks sharing some of my cards that have been published in celebration of PaperCrafts & Scrapbooking magazines inspiring influence over my crafty life and as my way of saying goodbye. A tribute to the magazine and therapy for me. Killing two birds, if you will.

This card was a fun one. I get a kick out of the rustic country themed crafting goodies and love to use them. My sister is married to a farmer so I guess I'm biased toward these sweet images.

My Country Best Wishes card was published in this year's Cool Tools Volume 2 issue.


I made a little panel of patterned papers from my 6x6 DIY Shop pad by Crate Paper (I have worn this one out!). I then ran that panel through my Cuttlebug using the Chicken Wire Embossing folder and lightly sanded the raised texture of the card to make it stand out. I stamped the rooster from PTI's On The Farm stamp set using second generation ink and layered the stamped sentiment over it using 1st generation ink. I love how it stands out over those cute roosters! The sentiment strip and accent panel are both ink distressed (use a sponge to make it lighter). It was really pretty easy and I think this method would look cute with so many different themes/patterns.
 
If you haven't yet picked up a copy (available in print or digital) of Cool Tools, I highly recommend it! It was very inspiring and will be a go-to in your inspiration collection for a long time.
Paper Crafts & Scrapbooking Cool Tools, Vol. 2
 
Thanks so much for stopping by to visit!
 
God Bless,
Mandy


Pin It

Thursday, November 20, 2014

Runway Inspired Challenge #72 and some Watercolor ... Tomatoes?!

Hello!

I'm back to share another card this afternoon, squeezing in a post before I take Miss Priss to her little gymnastics class.

I have the relatively new WPlus9's Punny Produce: Tomatoes set. And, I love it. I bought it to make a set of gift cards for Big Daddy's Grannie. She LOVES tomatoes. Like to the point it's a laughing matter in the family. I told him this summer after a visit with her (and the kids kept finding canned tomatoes in the bedrooms! lining just about every bit of floor space she had) - I said "Mark my words. I'm going to find a tomato stamp set and make her something for Christmas!"  LOL. And then little angels over at WPlus9 were reading my diary after I went to sleep and they came up with this adorable set!

I wanted to try something "different" using these stamps and decided to try these images out with watercolor effects. And I love how I turned out.


I stamped the outlines repeatedly up and down the sides of the panel, then stamped the inner layers using ink that was smeared on my craft mat and spritzed with water. I just trimmed the kraft cardstock panel with pinking shears - nothing fancy.
I'm playing along with Runway Inspired Challenge -- I love how the colors of the tomatoes match up with this dress and the strips of the images up and down the side of the panel remind me of the lines in her dress. Stop it.


Thanks so much for stopping by to visit!

God Bless,
Mandy Pin It

Wednesday, November 19, 2014

Publication Share - Rustic Thinking of You

Hello dear bloggy friends --

I made a "rustic" card tonight with a new stamp set and an idea that I have been noodling around on the last few days. Pulling out the wood patterned paper reminded me of one of my favorite cards to have published. It was in October's issue of PaperCrafts & Scrapbooking. I have never really taken the time to share my publications on my blog (Not sure why), but I think as a form of self-indulgent therapy to help with my mourning process, I shall share the projects here over the next few days.

This card was in the Trend Talk feature "Amp It Up with Amersands" in October 2014. I love all things rustic and when this card emerged as I played around in my craft room, it became one of my favorites.


This wood patterned paper comes from Record It! Pretty Things 6x6 pad. Since I used the last piece of that pattern tonight, I'm a little vaklempt. It's a great piece! :) I had die cut the ampersand using my Silhouette and PTI cardstock. I inked the edges lightly with light brown ink to add to the rustic look and even scissor distressed the edges of the main wood panel. I stamped the leaves from PTI's Leave It Be stamp set and die cut the rolled flowers using my Cricut and CTMH's Artiste cartridge. The sentiment is from Avery Elle's Laurels (love that font). [And, now I'm really laughing at myself because I no longer have either of those stamp sets. I don't let many things collect dust around here -- I like to sell quickly and buy new sets. It's kind of a sickness, really.] The little finishing touch of burlap under the accents fits with the theme and gives it more texture. And, the pop of color from the turquoise enamel dots finishes it all off.
 
 
Thanks for stopping by to visit!
 
God Bless,
Mandy


Pin It

Paper Smooches - Rustic Snowman

Hello!

Hope all is well out there in bloggy land. I know parts of the country are smothering in snow right now. Bless their hearts! We actually had a warm-up here in TN, with temps close to (if not there or above) 50 degrees today! It was really windy and that was uncomfortable, but I was able to run around all day and take care of errands. It was so nice to get that out of the way. Especially since I want to spend the rest of the week playing in my crafty space with new goodies that came in the mail today! Hee hee! I'm sure I'll be good and be taken over by my "chores" and "duties" around here and with the kiddos. (Those kids like to eat, like, everyday! What in the world?!) :)  But it's still nice to spend a few hours tonight fooling myself into thinking that I'll get my crafty groove on and whip up wonderful things I haven't even imagined yet. I even have "fabric-y" projects on the brain right now. I've got to gussy up and pull my sewing machine out and actually do it! :)

Tonight, I managed to whip up a quick card playing with my new PaperSmooches set, Freezy Fellas. Whoohoo! I love it! I'm playing along with Paper Smooches Sparks Challenge -- Anything Goes.


Here is my rustic little snowman (I can't get enough of wood patterned paper):


I first embossed the sweet little snowman using White Hero Arts embossing powder. I then stamped the scarf, hat, ribbon for hat, and nose on patterned paper using similar ink colors, trimmed and glued them down using a glue pen. I then added the strips of Silver Shimmer Trim (CTMH) to the bottom of the card for the ground. I heat embossed the sentiment in white and stamped the heart on scrap paper, trimmed and glued it down. After I adhered the panel to the card base, I added a black twine bow (PTI). The wood patterned paper is from Record It Pretty Things 6x6 paper pad from My Mind's Eye. I'm pretty sure that was my last piece of that paper. Sniffle. I used the other piece for this card which was published in October's issue of Paper Crafts & Scrapbooking.
 
Thanks so much for stopping by to visit!
 
God Bless,
Mandy


Pin It

Tuesday, November 18, 2014

AEIheartU Challenge #18 - Holiday

Well I've done it. I've broke the seal on the Christmas cardmaking and now I can't stop. :) Ha ha. Once I start on the Christmas themes, I want to keep going. They are my all-
time favorite to make.

Today, I had a few moments to steal away in my crafty space so I played along with a couple of challenges. One I'm happy enough with to post. :) It happens.

AEIHeartU's Challenge is all about Holidays.

Challenge 18
I had grandiose plans to make a Holiday card with one of my non-holiday sets (not like I have a ton of them, but still) and I couldn't get one to suit me! I may try again with another idea. I may need to write it down!
 
 
Here is my card using Winter Wreath:


This one is pretty simple. I stamped the sentiment "Peace Love & Joy" repeatedly on the background using Latte pigment ink by Amuse Studio. I then stamped the wreath twice, once in Simply Chartreuse by PTI and then in Olive by CTMH. I stamped the bow on scrap paper in Tulip (CTMH) ink, trimmed it with my Micro Tip Scissors (MUST HAVE!) and adhered it to the bottom of my wreath. I then stamped some of the berries in Chocolate (CTMH) ink to finish it off before adhereing it all to a Kraft card base.
 
Thanks for stopping by to visit!
 
God Bless,
Mandy


Pin It

Sunday, November 16, 2014

Retro Sketches #141 - Beginning Christmas

Hello and happy pre-winter! Yikes!

Just last week I had to mow the lawn again - not even kidding. Green as a gourd here and looking great. While we can normally expect temps in the 50s and 60s this time of year in TN we are in the 30s and 40s with lows in the 20s overnight. Wow. We even have forecasts of snow for overnight/early morning. My kids are OVER. THE. MOON. They plan to do the full snow dance routine tonight! --- sleeping with pajamas inside out, flushing ice cubes down the toilet, and sleeping with a spoon under their pillows. Ha ha! My daughter was behind me earlier watching the weather on the local news and shouting "Yes!" every time they mentioned the expected issues during morning commute tomorrow. :) Since Big Daddy has to be at work by 6am, I'm not so sure he will be feeling the same way if it all actually happens like predicted. (Which is rare, BTW.)

On to my card! Since it's totally ugly here and been a cold rain all day long, we came right home after lunch and I went straight to my sweats and fuzzy slippers and up to my crafty space! I've started the Christmas card parade and even made several, several tags this week. I don't know yet if all of these will turn into gifts or I will use them myself, but I so love making them - Christmas projects are my all-time favorite!

I played along with this sketch from over at Retro Sketches:

 
Here is my card using Avery Elle's Winter Wreath stamp set and My Mind's Eye Christmas patterned papers:
 
 
I stamped the pinecones and branches from the set using the "rock and roll" inking method for some of the cones on my Chocolate ink pad. I drew the "stitching" around the accent panel and layered it all up onto a plain white card base. Easy as pie!
 
I made this card as part of a little "set" that I coordinated together this afternoon. I used the same stamp set and paper pad for each card to keep them feeling cohesive while using different layouts, etc. for each one.....


(Apologies the photos aren't better. It was so dark this afternoon, I didn't have enough natural light to get good shots. I've got to figure out the artificial light thing. Yuck.)
 
Thanks so much for stopping by to visit!
 
God Bless,
Mandy


Pin It

Saturday, November 15, 2014

CAS(E) this Sketch! #100

Hello!

I stole away in my room quite a bit yesterday (and had the shoulders & neck ache to prove it) and decided to play along with this week's challenge at CASE this Sketch!

Here is the sketch:


I used my newly acquired "Hey Teacher" stamp set by Simon Says Stamp.


I stamped the rulers repeatedly to mimic the shape in the sketch, then colored them in using Spectrum Noir Markers. The sentiment is from the same stamp set but the apple from CTMH's Teacher Appreciation stamp set. (It's an ADORABLE set, I've yet to ink it up and need to get it going on some cute projects and share!) I finished it off with a piece of red twine after I layered it up on a black card base. Quite simple and easy to make (just find something fun to watch on TV and color away!)
 
 
Thanks so much for stopping by to visit!
 
God Bless,
Mandy
Pin It

Friday, November 14, 2014

Sharing Paper Smooches Cards

Hello!

I'm popping in to share a few cards I made for PC&S last submission call, Stamp and Ink It! We're not even going to delve into that one but regroup and move on. :)

I had fun playing around with some of my newer PS stamps, Green Thumb and Blossoming Buds.

First up, Green Thumb (and fun with my Spectrum Noir markers and a post it note pad!):

 
I did a lot of masking on this one, adding a "layer" of the gardening images at a time. I started with the boots, masked then stamped the water can, and so on. I masked them all when I added the (Tim Holtz Burlap) stencil and sponged ink around the bottom for my "earth". I used a darker brown over the stencil, then went back over all of it using a lighter brown (CTMH Desert Sand). I then used a sponge and CTMH Sky ink around the top for the sky. I colored my images last with my Spectrum Noir markers.
 
 
This card also uses the Green Thumb stamp set, but I used different patterned papers to create the colorful boots and finished it with my Simon Says Stamp Color and Sunshine stamp set.
 
 
I trimmed each boot and then adhered the row and attached that panel to the card base, which I kept all white to allow the adorable boots to take center stage.
 
 
Now onto Blossoming Buds. I flipped over this set when it came out and now have played with it several times. I hope to get to it more over my much anticipated cold-weather-lock-in crafty sessions. 8-)
 
 
I embossed these images in white in each corner before coloring them in with CTMH Watercolor pencils, then brushing over with a wet paint brush for the lovely watercolor effect. I stamped Lawn Fawn's "Our Friendship Grows" sentiment to balance it out and I thought it paired beautifully with the image!


 Using Blossoming Buds again (the larger floral cluster), I stamped them close to the top and bottom. I trimmed in on each side using my paper cutter for both ends of the panel and then trimmed around the edges with my CTMH Non Stick Micro Tip scissors. (These are the BEST.) I colored the images last with my Spectrum Noir markers. (Because I've learned the hard way UGH to color last! There is nothing like finishing an awesome coloring job only to mess it up when you trim or do further stamping, etc. I know you are all feeling me!). I stamped the PaperTrey Ink sentiment and adhered the panel to a card base lighly stamped with a Hero Arts Design Block (Envelope pattern).
 
Wow. That's a lot of cards and I'm happy I took the time to share! I hope everyone is enjoying the rev up for the Christmas season! I've spent my morning (so far) making Christmas tags which I plan to share here soon!
 
 
Thanks for stopping by to visit!
 
God Bless,
Mandy


Pin It

Wednesday, November 5, 2014

A couple of cards to share

Hello there.

I'm popping in to share a couple of cards I made this morning during another rainy fall day here in TN. I took advantage of the blah day and spent some time in my crafty space. I tried to get up and clean a few things every now and then so I would feel like I was earning my keep. :)

The first is based on the "Something to Chair" Challenge over at Moxie Fab World. The challenge is to use this photo for inspiration.

 
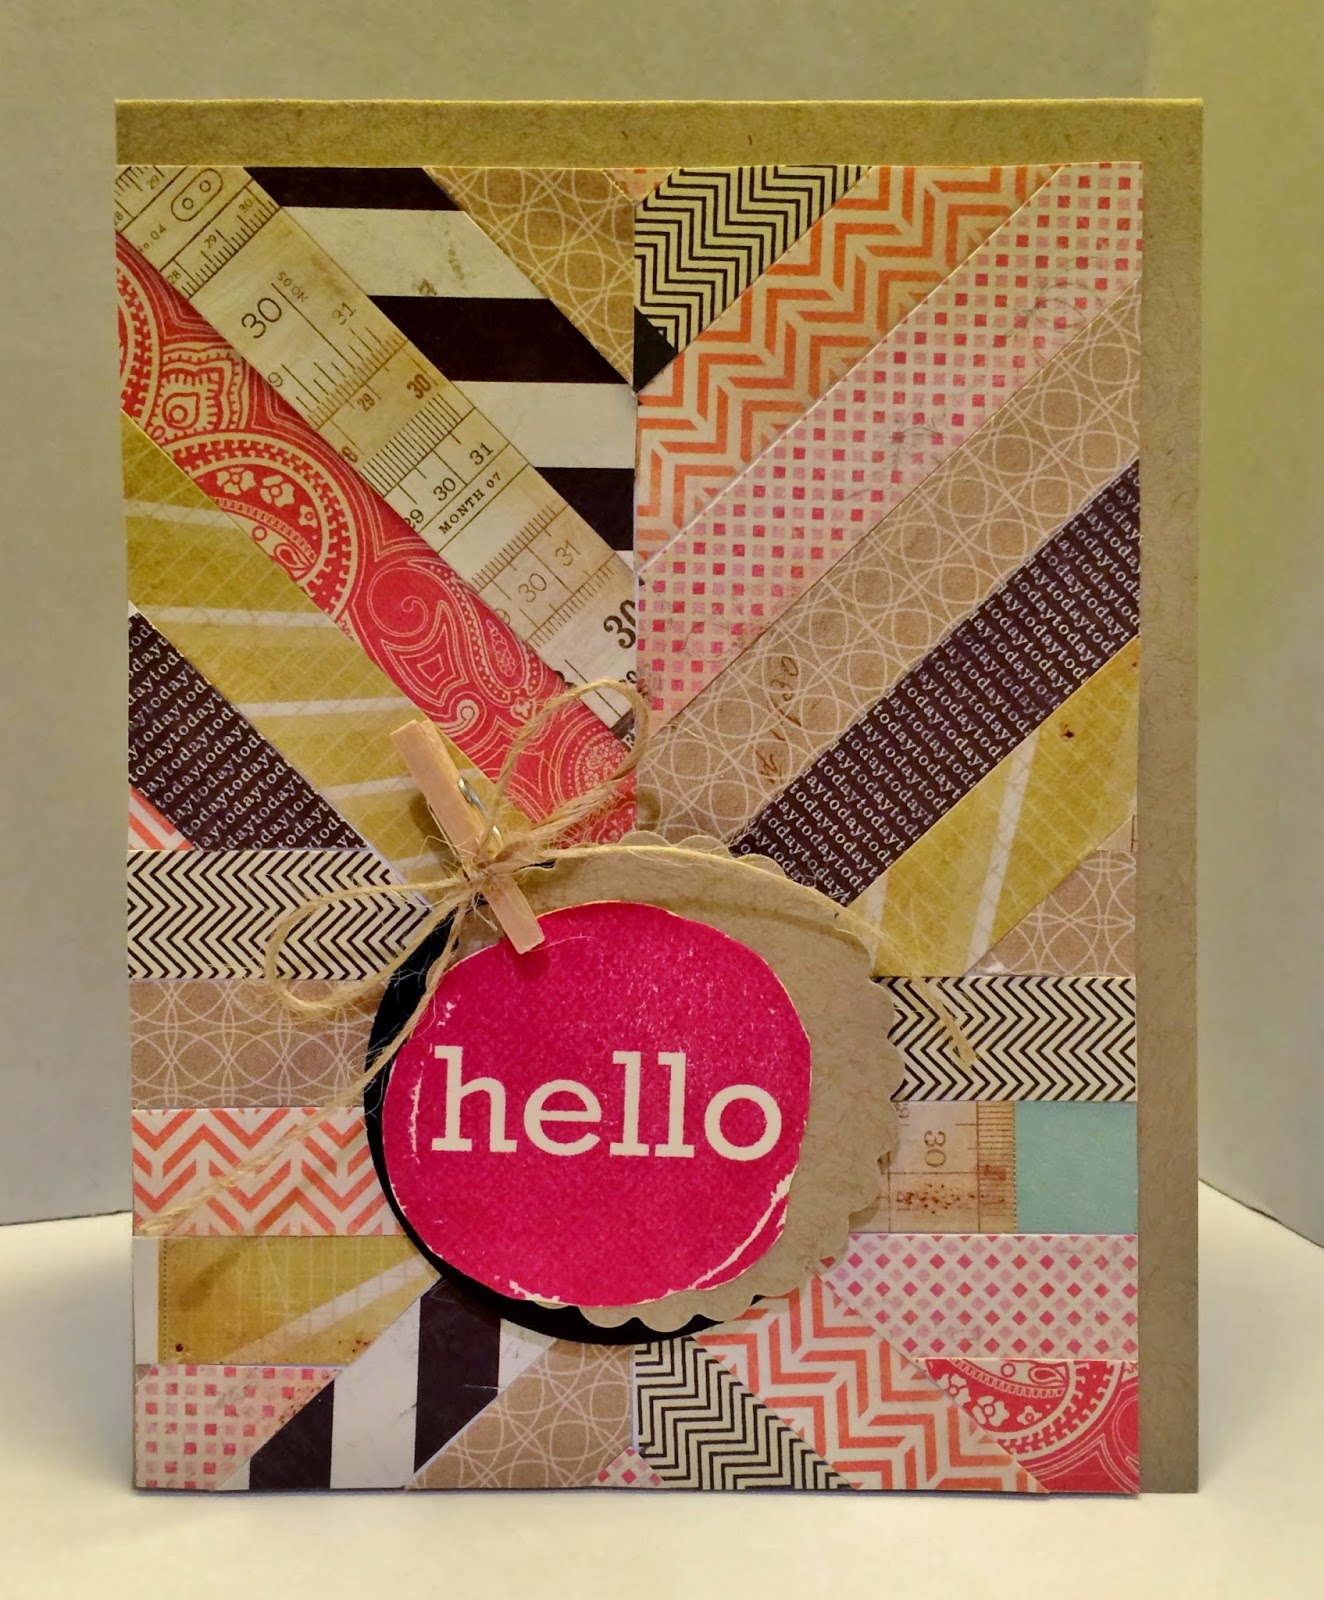
I decided to somewhat mimic the multiple patterns and colors found on the chairs. Great use for my bazillion 6x6 paper pads.


I cut strips of papers from my Basic Grey "Hey You" pad, Pink Paislee "Hey Kid" pad, and Crate Paper "DIY Shop". I cut one end of all the strips at the same angle and glued them down on a line I had drawn to bisect the card and line up my strips. After they were all taped down, I stamped the "hello" from my PTI "Splat" set and trimmed it. I layered it over a couple of punched circles from Kraft and Black PTI cardstocks.  The accent panel is on a Kraft card base.


My next card is one I made for the CAS(E) This Sketch challenge. I lerve this sketch.


I was SUPER excited to use my new Lawn Fawn Snow Day 6x6 pad. I fell in love with this paper as soon as I saw it. It's so cute! :)  I don't usually have the "cutesy" Christmas papers, but I may be now hooked! I'm in love with this card. I'm thinking if I only had about 48 more of these papers, I'd make this our family Christmas card. LOL.


The accent panel is all a piece of patterned paper from the pad. I trimmed it and split it to match up with the sketch. The other two strips are from papers I had left from scraps from the same pad. I white embossed the sentiment from my PTI O'Tannenbaum set. After layering those pieces, I drew the frame using a journaling pen and then added the sequins from last years Peace Love & Joy sequins (also by Lawn Fawn). Super fast to make!
 
 
Hope everyone is having a fabulous week! Thanks so much for stopping by!
 
God Bless,
Mandy
Pin It

Tuesday, November 4, 2014

SUPER Exciting News!!!

Good morning!!!

I'm so excited to say what I've been holding in all weekend! :) I am a World Card Making Day contest winner!!! I still keep looking at my email to make sure it's true (and because I still get a little thrill when I read it again. LOL).

My winning card will be published in the April 2015 issue of PC&S so I can't share a photo of it until then.

I have nothing else to share at this point. LOL. But I couldn't keep this news quiet any longer! :)

Here is the formal announcement:


Thanks for stopping by!

God Bless,
Mandy

Pin It

Monday, November 3, 2014

October Gallery Challenge

I know -- zero to sixty today. Now I'm back with a vengeance!

I wanted to share my October Gallery Challenge project that was a winner this past week. :) I was super excited when I found it LATE Friday night, while trying to simmer down to go to sleep and scrolling through my Bloglovin' feed. (A night-time ritual, between reading Bible chapters and perusing Pinterest obsessively.)


October's Challenge was to create a Halloween themed project for the Gallery. I shared a décor project I made for my kiddos bathroom using frames I picked up at a local thrift store and spray painted black. I also picked up a "cheap" one at WalMart. I think I actually bought this one a while back for another purpose and have yet to execute that idea. (Classic Mandy!)


The above set is my "winning" entry. I cut the witch silhouette and moon using my Silhouette from files I created myself. I used Black cardstock from PTI and Honey cardstock (backside of the textured cardstock - I'm so sad I'm almost out of that. I've hoarded it for a LOOOOONG time) and I inked the edges using a sponge and Honey ink from CTMH. The gray is also CTMH, I think Gray Wool, but I can't make any promises. The black enamel stars are also from CTMH and are currently available in the Idea Book or on the website. I LOVE these!

The frame on the left is upcycled and spray painted, while the one on the right is new from WalMart (only $4!).


This frame is also part of the set. I salvaged the frame from Goodwill, ripped out the guts that were 1980's home décor and painted it. I backed the frame with a piece of CTMH Moonlight patterned paper. I die cut the letters from Oracal 651 vinyl using my Silhouette and added the adhesive felt shape from more hoarded CTMH "Moonlight" leftovers onto the outside of the glass.  
 
 
Here is a picture of the full set hanging in The Piglets' bathroom.
 
 
It was a lot of fun to make and Miss Priss LOVED it. I also added a vinyl spider hanging from a web onto their mirror! She was happy that it was a "cartoon" spider instead of scary. 8-) LOL
 
 
Thanks so much for stopping by to visit!
 
God Bless,
Mandy

Pin It

Paper Smooches SPARKS and a Hello

Hello!

Long time no see --- I'm finally back. I took a little hiatus from my blog when school started back this year. 3 months! Wow. It passed in a blur, of course. I made myself TOO busy trying to catch up on things around here when the kids weren't here, managed to get sick once, had a sick child once, and have been busy helping out up at the school often (both for the PTO and The Piglets' teachers). It's been good, but busy. I was still reading when I could and crafting when I could to keep from going crazy. :) (Not that I didn't go right down that lane full-speed some of the time!)

Now -- back to the fun stuff! I'm excited to be getting back in the fun. 8-) I'm playing along with Paper Smooches SPARKS challenge. This week is "Anything Goes" and I have had fun playing with my "Green Thumb" stamp set found in the Paper Smooches store here.


Here it is.........


I stamped the fun little seed packets and a vegetable on each, masking each time. I then placed masks over all the packets before stamping the Hero Arts Design Block Envelope Pattern over the face of the card. I colored the images with Spectrum Noir markers, added the cardstock strips (inspired by the seed packets themselves) and then stamped my sentiment. Basically a one layer card, although not quite technically, all the way, one - layer. Close enough in my book. 8-) The cardstock strips are Cocoa and Tulip by CTMH, the ink of the background stamped in Chocolate (CTMH).
 
Thanks so much for stopping by to visit!
 
 
God Bless,
Mandy


Pin It

Popular Posts