Sunday, June 12, 2016

Digi Box Designs - Get Well Soon Bear

This is my second post of the day. To check out my Christmas Card Challenges post, click here.

Hello!

I made a fun card using another digi stamp from Digi Box Designs yesterday and wanted to share it with my crafty friends today. :D


I used the Digi Get Well Bear and resized and printed him using my Silhouette software again. Other software can be used, I'm just more comfortable with my knowledge base in the Silhouette. ;)

After I printed him, I colored using Prismacolor Pencils and then cut using my Pix Scan mat. From there is was just a matter of layering up some cute Fancy Pants Design papers over the Large Grid stencil from MFT and Fossilized Amber Distress Ink.


I didn't use the "Get well Soon" sentiment that comes with Mr. Bear here because I fell in love with this stamped sentiment in conjunction with the image/Band Aid. (It's from MFT's Get Well Wishes). I finished it off with a button, jute twine, and a few sequins.
 
 
Thanks so much for stopping by! It's so hot and humid here today, I foresee a lazy Sunday afternoon ahead of me. .....Well, either that, or doing some crafty/bloggy catch up. Hmmm. It could go either way!
 
 
Have a great week,
Mandy
 

Pin It

Christmas Card Challenges - #28 - Word Prompt

Hello!

It's already time for another fun challenge over at Christmas Card Challenges. Whaaaaattt??? I know! It's going by so fast. I don't even want to think about how fast this year has been! Sniff.

This challenge is a word prompt:


I am recycling again. ;) I used my MFT Tag Builders 4 dies and the front of a Christmas card from this past year. I used the star and banner from the same die set. I also embossed a panel using the Jumbo Polka Dot cover plate. The sentiment is stamped from Paper Smooches Christmas Sampler set.
 
Please hop on over and play along! Check out the gallery and DT cards for more inspiration. :)
 
God Bless,
Mandy
 
 
Pin It

Thursday, June 9, 2016

Addicted to Stamps & More #197 - Make Your Mark

Hello!

I'm popping in tonight after an exhausting week! Wow. I've been running kiddos all over and spent most of my days in the car between their summer activities. Thankfully, this isn't going on all summer (I wouldn't allow it, for one!) and it has been a good week. We are just all worn out. :) We will probably crash tomorrow!

I wanted to share my card for the current Addicted To Stamps & More Challenge - Make Your Mark.With all the craziness, I didn't schedule my post! Eeks!


There is also a super fun sponsor:

We have a lovely sponsor from A Day For Daisies:


 Prize is: $ 12.00 Gift Certificate


I played around with a Flourishes stamp set that is new to me. I colored it with Copic markers, used my Silhouette Pix Scan to cut it out, and mounted it with foam tape. The sentiment is Simon Says Stamp die and stamp. I die cut about 1,000 "prayers" from scrap brown cardstock and layered them together for more dimension. ; )~   I stamped the rest of the sentiment on a small strip and layered it up over the edge. The background is stamped with MFT's Typewriter Text in Daffodil ink and die cut using the MiniScallop rectangle from MFT. The very back panel is die cut using Blueprints 13.
 
 
It turned out super cute. The lighting really didn't show it off properly in my photos (even after several attempts. Drat. The struggle is real!) ; )
 
 
Thanks SO much for stopping by to visit! Please check out the fun over at the Addicted To Stamps and More challenge!
 
God Bless,
Mandy
 
 
Pin It

Wednesday, June 8, 2016

ABC Christmas Challenge - 'L' - Things Beginning with L


Hello!

It's time for another fun challenge over at the ABC Christmas Challenge! This time we are all about things beginning with the letter L. It could be lime green, laughter, lists, lollipops - anything Christmas-y with letter L is good to go. So fun to stretch and try to think of something new!


To main Blog


We have another fun sponsor with this round, also. One lucky winner will receive 3 images of his/her choice from the fabulous Etsy shop:


For my "L" card, I'm featuring a Lamppost spreading Light in a snowy background. :) This is SO fun but I can't take credit for the idea! At least one of the MFT DT made a card like this when the die was released (I think Barbara Anders) and I fell in love with it. I've been meaning to use my die for a similar design and just now getting around to it!


I sponged my background with Distress Inks Salty Ocean and Fossilized Amber. I die cut 6 of the lampposts from scrap black cardstock and glued them together before adhering to the colored panel. The stitched snow drifts are also MFT and cut from PTI Soft Stone cardstock. I glued them to my panel and cut with the MFT Double Stitched Rectangle Die-namics. I stamped the sentiment from PS Christmas Sampler and masked it off before adding light weight spackle (poor girl's embossing paste) over the SSS Falling Snow stencil. I double matted using Pure Poppy and black cardstocks before placing on my Vintage White card base and securing a red twine (Recollections) bow to finish it off.
 
 
Please hop on over and join in the fun! We'd love to see what you create using this challenge letter. :)
 
 
Thanks so much for stopping by to visit! Please come back again soon!
 
God Bless,
Mandy


Pin It

Tuesday, June 7, 2016

2 Creative Chicks Showcase #11


Hello!

I've got a card to share today for this month's showcase over at 2 Creative Chicks. It's always Anything Goes so it's a great chance to play along and check out some fun and motivational inspiration in the gallery.


2 Creative Chicks


I played with my Silhouette and cardstock to make this little cutie: (I really should play around like this more often!)


These are all CTMH neutral colors (probably some are retired I've had them so long!) but they worked out perfectly. I stamped the sentiment from WPlus9's Strictly Sentiments 2 stamp set and trimmed the strip into a little banner, secured with tape and a button with twine bow. It really doesn't need anything else and that's kinda the fun part. I did gently ink the edges of the light colored fur with brown ink. But no embellishing otherwise.
 
I hope you come over and play along and check out the fun!


Challenge#11
Starts June 1, 2016
Ends June 30, 2016
Click HERE to link up!


God Bless,
Mandy
Pin It

Sunday, June 5, 2016

Christmas Card Challenges - #27 - Photo Challenge

Hello!

I'm popping in to share my card for the latest Christmas Card Challenge. :) This week we have a fun "jingle bells" photo inspiration.


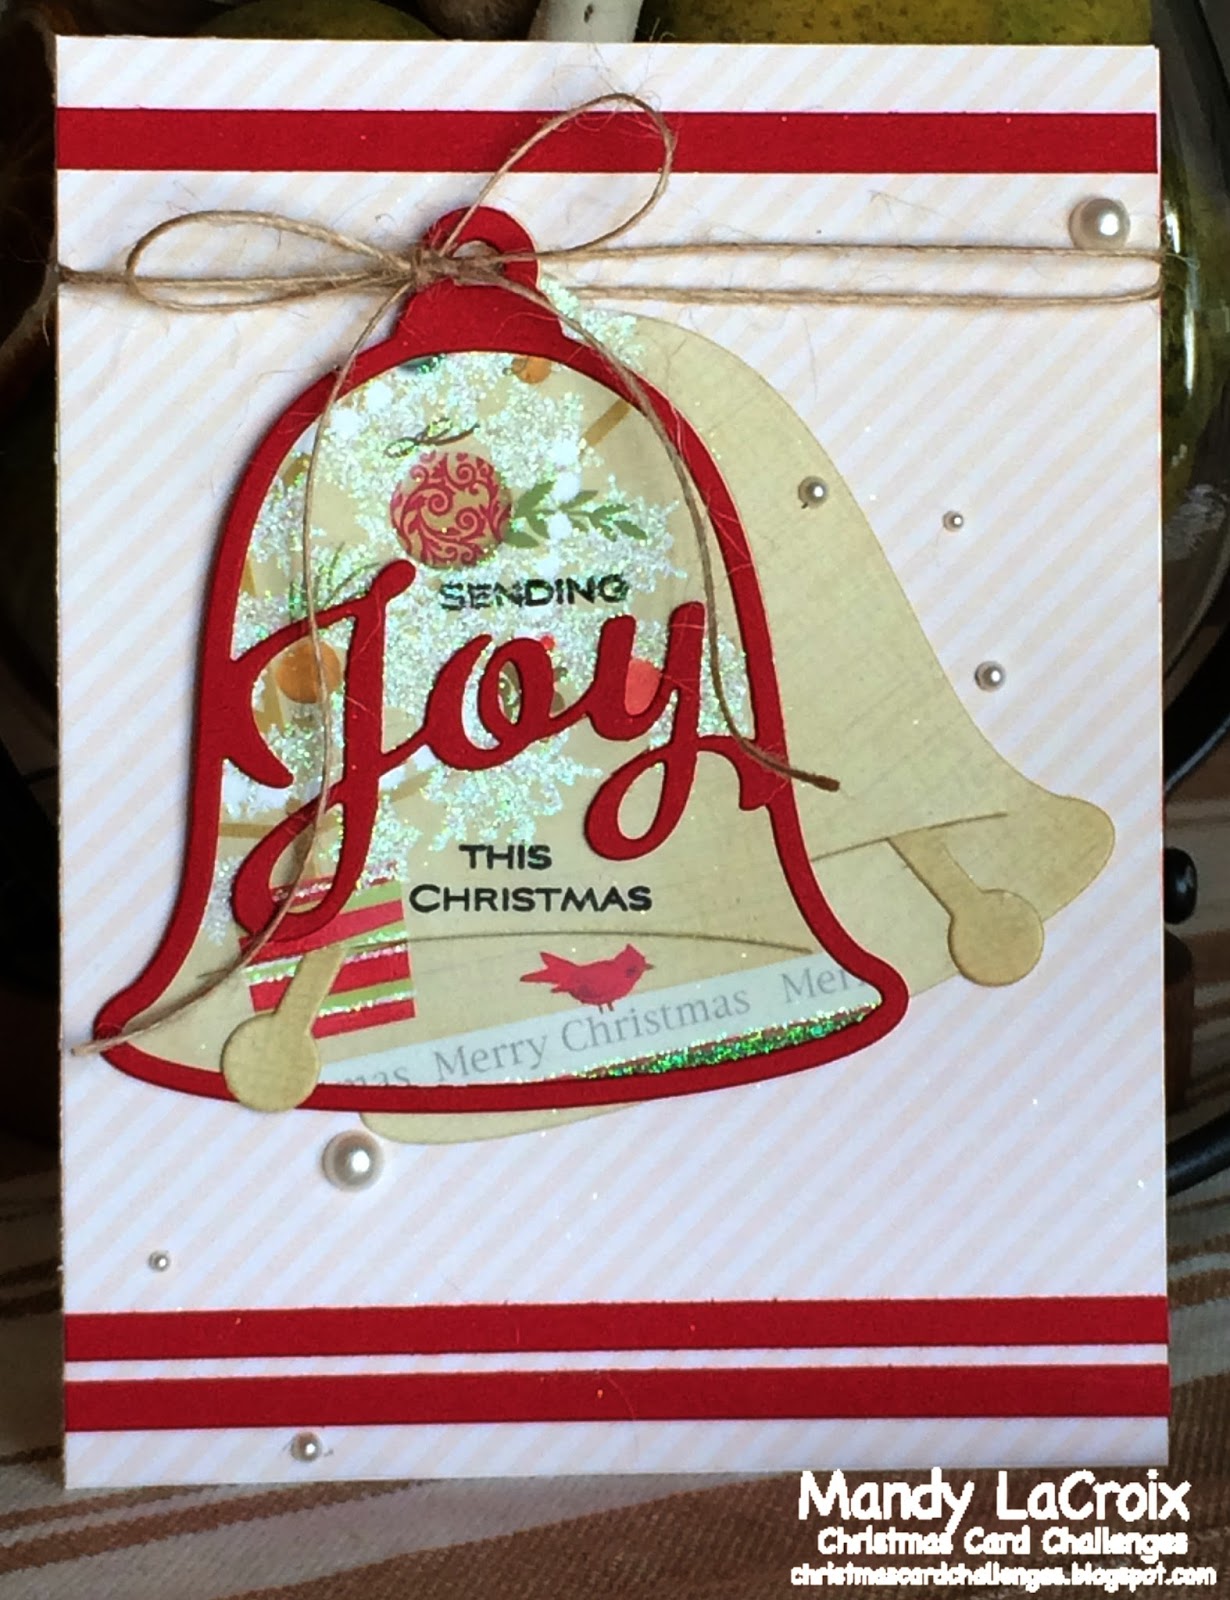
I used another kind of Christmas bell from my PTI Enclosed: Bell stamp and die set. I also recycled a Christmas card that I had saved from this past year. Some of these cards are so fun to die cut parts of the pattern. Last year, I made a whole stash of Christmas gift tags using old cards that someone had given me. It was so cute and a great way to use up and recycle. 8-)


The die cuts are layered over a panel of striped paper from Lawn Fawn's Let's Bokeh  6x6 pad. I added strips of PTI Pure Poppy cardstock to frame it up. The stamped sentiments are from the Enclosed: Bell stamp set and coordinates with the Joy die cut.
 
Thanks so much for stopping by to visit! Hope you are enjoying a warm, sunny afternoon with clear blue skies wherever you are. :)
 
God Bless,
Mandy
Pin It

Friday, June 3, 2016

Digi Box Designs - Sending Snail Mail

Good morning!

I'm still here! :) My blog is hanging on by it's poor little tattered cuticle fingernails, but I'm still here.  I like to point out occasionally, that just in case I've somehow given off the impression that I'm on the ball, I'm really not. Ha! Actually, it's going really well. We are pretty much settled into our new digs and now tackling some DIY projects we have on our "list". I really need to write "The List" down. I seem to think of new items I'd just "love to do" every day! I'm not sure I even remember them all. ...And don't think The Hubs's list isn't growing, because it IS. I really need to write his down.

Now for the FUN part. I'm excited to be joining the Digi Box Designs DT! Whoo-hoo! Super fun! Today, I wanted to share a card I've made using one of the ADORABLE digi stamps I got from the online store. You simply must check it out if you haven't already. ADORABLE, I say!


For my first card, I used the "Snail Mail" digi stamp and went CAS. (One of my favorite design techniques....but I have to be channeling the CAS mojo.)


I don't really, well, I don't have any photo editing software, but I'm turning into a Silhouette nerd (thanks to Middle Sister), so I opened this little cutie in my Silhouette software for sizing and editing. I knew I wanted him off the edge of my main panel and being the tightwad that I am, I didn't want to waste my good expensive cardstock I used for Copic coloring. ;) I created a rectangle the size of my accent panel in the software and then could place and resize the snail as I wanted it to look on my card. I used the knife tool to cut "Snail Mail" sentiment and move to the side, so that it would also line up the way I wanted on my card. I printed then colored with Copics before I trimmed it down. "Sending" is stamped from a Simon Says Stamp stamp set (Sending and Wishing). It fit perfectly.
 
I layered my panel over a slip of patterned paper (My Mind's Eye scrap that was in my stash) for interest and used foam tape for dimension. I love this technique for then slipping some embellies slightly under the panel. Adds some interest without taking over the image because they are just peeking out. Just don't do what I did and place your foam tape so close to the edge you can't slide your goodies under the edge the way you want. Haha! (Typical.) That's it. Easy peasy lemon squeezy!
 
If you want to try something similar and need some adorable summer images, you're in luck! Five new images were just released and are available now. Plus there's a sale going on and it's a great time to try out something new and take it for a test run.


Just for kicks and giggles, I have a couple of photos to share of our latest project around the house. I thought it'd be fun to share even thought it's not cards. It's still creative, just involves a different medium. ;)
 
This is the before picture......
(well, almost before. We forgot to make one before we removed the "Sunset" inserts from the windows. You can see the last two remaining on the left hand side. There was one in each window forming the sunset pattern with the biggest openings in the center.)


Annnnnnnd, the after:

 
We stained the doors, painted the trim a soft, warm white (That took two trys to find the right color. The poor man door trim has 4 coats of paint on it! HA!), and added the hardware. (Handles and decorative hinges on the garage door. It's hard to see in this pic.) We will lack painting the light fixture and doorknob, but I plan to make The Hubs do that this weekend. Oops! Look at that! Something else for his list. ;)-


Well, thanks SO much for stopping by to visit! I hope you will come back again soon and that you will check out the fun over at Digi Box Designs! And if you haven't already, be sure to like the Facebook page to follow along with the DT's artwork and other's who share their creative projects!
 
God Bless,
Mandy
 
Pin It

Popular Posts